Nagios 모니터링 시스템 2 배포
첫 번째 부분 (https://www.roamway.com/?p=481) 환경 설정 후 ,Nagios 인터페이스가 등장했습니다。
이 부분은 서버와 클라이언트의 구성을 시작합니다.,기본 모니터링 인터페이스 구성。
리눅스 클라이언트
1.Nagios 사용자 추가
useradd -s / usr / sbin / nologin nagios
2.nagios-plugins-1.4.14 설치
./구성
하다 && 설치하다
3.디렉토리 속성 변경
chown -R nagios:nagios / usr / local / nagios /
4.nrpe-2.12 설치
./구성
모두 만들다
설치 데몬 만들기
설치 데몬 구성 만들기
5.xinetd 스크립트 설치
install-xinetd 만들기
6.nrpe 구성 파일 편집
vim /usr/local/nagios/etc/nrpe.cfg
# service_address = 127.0.0.1을 찾고 앞의 #을 제거하고 127.0.0.1을 로컬 주소 192.168.17.55로 변경합니다.
![]()
Allowed_hosts = 127.0.0.1 뒤에 모니터링 서버의 IP를 추가합니다.,쉼표로 구분
![]()
저장 및 종료
7.nrpe 파일 편집
vim /etc/xinetd.d/nrpe
only_from = 127.0.0.1 뒤에 192.168.18.7 추가,쉼표를 사용하여 IP 구분

저장 및 종료
8./ etc / services 파일 편집,NRPE 서비스 증가
vim / etc / services

9.xinetd 서비스 다시 시작
/etc / init.d / xinetd 재시작
10.nrpe 구성 파일 편집
vim /usr/local/nagios/etc/nrpe.cfg
이 파일의 구성 정보에 다음 내용을 추가하십시오.
명령[check_users_1]= / usr / local / nagios / libexec / check_users –w 5 -씨 10
명령[check_load_1]= / usr / local / nagios / libexec / check_load –w 15,10,5 -씨 30,25,20
chmmand[check_sda4_1]= / usr / local / nagios / libexec / check_disk –w 20% -씨 10% -p / dev / sda4
명령[check_zombie_procs_1]= / usr / local / nagios / libexec / check_procs –w 5 -씨 10 –S Z
명령[check_total_procs_1]= / usr / local / nagios / libexec / check_procs –w 150 -씨 200
명령[check_swap_1]= / usr / local / nagios / libexec / check_swap –w 20 -씨 10
저장 및 종료
11.방화벽은 TCP 포트 5666을 엽니 다.,그리고 selinux를 닫으십시오.
12.nrpe 데몬 시작
/usr / local / nagios / bin / nrpe –c /usr/local/nagios/etc/nrpe.cfg -d
13. /usr / 로컬 / nagios / libexec / check_nrpe -H 127.0.0.1 연결이 거부되었다는 메시지가 표시됩니다.
![]()
이 질문을 먼저 여기에 넣으십시오.,나중에 해결。
섬기는 사람:
1.nrpe-2.12 설치
./구성
모두 만들다
설치하다
2./ usr / local / nagios / libexec / check_nrpe -H를 실행합니다. 192.168.17.55,버전 번호가 나타납니다.,그런 다음 서버와 클라이언트는 정상적으로 통신합니다.。
3.commands.cfg 편집
vim /usr/local/nagios/etc/objects/commands.cfg
commands.cfg에 다음 내용을 추가하세요。
명령 정의{
command_name check_nrpe
명령 줄 $ USER1 $ / check_nrpe –H $ HOSTADDRESS $ -c $ ARG1 $
}
저장 및 종료
4.services.cfg 편집
vim /usr/local/nagios/etc/objects/services.cfg
services.cfg가없는 경우 직접 작성해야합니다.
아래 내용을 붙여 넣기
서비스 정의{
호스트 이름 192.168.17.55
service_description 사용자
check_command check_nrpe!check_users_1
}
서비스 정의{
호스트 이름 192.168.17.55
service_description로드
check_command check_nrpe!check_load_1
}
서비스 정의{
호스트 이름 192.168.17.55
service_description sda5
check_command check_nrpe!check_sda5_1
}
서비스 정의{
호스트 이름 192.168.17.55
service_description 좀비 프로세스
check_command check_nrpe!check_zombie_procs_1
}
서비스 정의{
호스트 이름 192.168.17.55
service_description 전체 프로세스
check_command check_nrpe!check_total_procs_1
}
저장 및 종료
5.hosts.cfg 편집
이 파일은 기본적으로 존재하지 않습니다.,수동으로 생성해야 함
vim /usr/local/nagios/etc/objects/hosts.cfg
아래 내용을 붙여 넣기
호스트 정의 {
호스트 이름 192.168.18.7
별명 1 92.168.18.7
주소 192.168.18.7
contact_groups sagroup
check_command check-host-alive
max_check_attempts 5
notification_interval 10
notification_period 24×7
알림 _ 옵션 d,유,아르 자형
}
호스트 정의 {
호스트 이름 192.168.17.55
별명 192.168.17.55
주소 192.168.17.55
contact_groups sagroup
check_command check-host-alive
max_check_attempts 5
notification_interval 10
notification_period 24×7
알림 _ 옵션 d,유,아르 자형
}
저장 및 종료
6.nagios.cfg 편집
vim /usr/local/nagios/etc/nagios.cfg/nagios.cfg
nagios.cfg 파일에 다음 정보를 추가합니다.,즉, nagios.cfg 파일에서 방금 만든 hosts.cfg 및 services.cfg를 선언합니다.。
cfg_file = / usr / local / nagios / etc / objects / hosts.cfg
cfg_file = / usr / local / nagios / etc / objects / services.cfg

저장 및 종료
7.구성 파일의 정확성 확인
/etc / init.d / nagios 중지
/usr / local / nagios / bin / nagios -v /usr/local/nagios/etc/nagios.cfg 구성 파일의 정확성 확인。
![]()
8.Nagios 시작
/usr / local / nagios / bin / nagios /usr/local/nagios/etc/nagios.cfg –d
9.브라우저 입력http://192.168.18.7/nagios 모니터링 인터페이스를 볼 수 있습니다.。
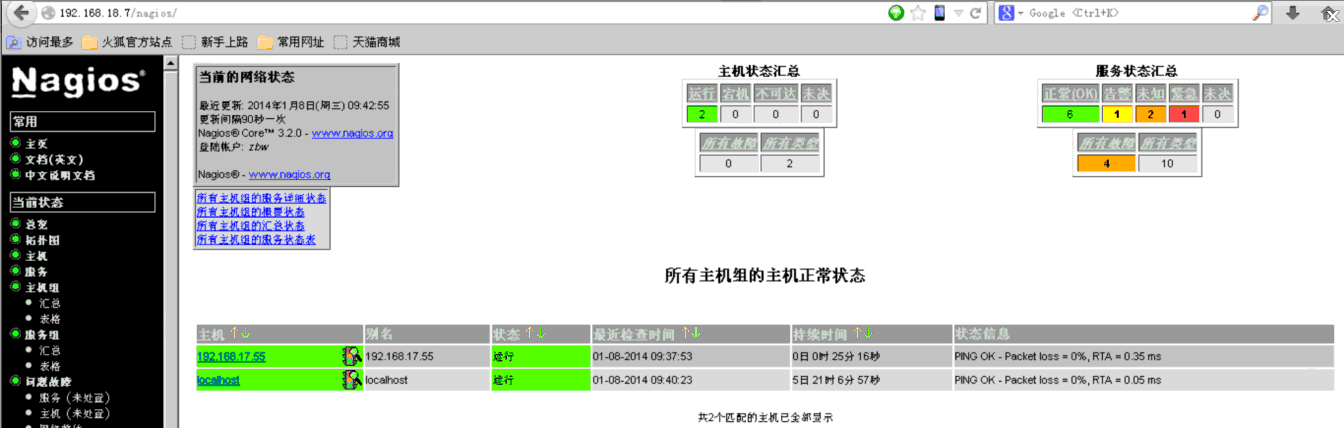
지금까지 호스트 모니터링 상태 인터페이스가 나타났습니다.,그러나 많은 예외가 있습니다。후속 조치는 모니터링을 정상으로 복원하기 위해 추가 조정을 수행합니다.。