鱿鱼代理部署
它是本文的转发代理, 在网络质量较差的情况下可以加快浏览速度.
客户: 192.168.17.100 Win7的
服务器: 192.168.137.24 CentOS的 6.5
软件: 鱿鱼2.7.STABLE9.tar.gz
脚步:
1. 安装编译工具和其他依赖包
百胜安装gcc gcc-c ++ autoconf bison automake zlib * fiex * libxml * ncurses-devel libmcrypt *
libtool-ltdl-devel *
2. 生成日志和cahe字典
mkdir / var / log / squid
没有人:没有人/ var / log / squid
mkdir / var /假脱机/鱿鱼
没有人:没有人/ var / spool / squid
3. 配置和安装
CFLAGS =”-氧气” ./配置 –前缀= / usr / local / squid \
–启用以下x转发 \
–with-maxfd = 65535 \
–启用-dlmalloc \
–启用epoll \
–启用堆栈跟踪 \
–enable-async-io = 240 \
–启用异步io \
–enable-removal-policies = heap,鲁 \
–启用杀死父母的黑客 –启用SSL
使
进行安装
4. 初始化
/usr / local / squid / sbin / squid -z
5. 编辑配置文件
vim /usr/local/squid/etc/squid.conf
添加以下配置:
acl全部src全部
ACL管理器原型cache_object
ACL本地主机src 127.0.0.1/32
ACL本地网src 192.168.0.0/16
ACL to_localhost dst 127.0.0.0/8 0.0.0.0/32
acl SSL_ports端口 443
acl Safe_ports端口 80 # http
acl Safe_ports端口 800 # http1
acl Safe_ports端口 21 # ftp
acl Safe_ports端口 443 563 # https, 新闻
acl Safe_ports端口 70 # 地鼠
acl Safe_ports端口 210 # 威斯
acl Safe_ports端口 1025-65535 # 未注册的端口
acl Safe_ports端口 280 # http-mgmt
acl Safe_ports端口 488 # gss-http
acl Safe_ports端口 591 # 文件制作者
acl Safe_ports端口 777 # 多语言http
acl CONNECT方法CONNECT
http_access允许管理员localhost
http_access拒绝管理员
http_access拒绝 !安全端口
http_access拒绝CONNECT !SSL_端口
http_access允许localnet
http_access拒绝所有
icp_access允许localnet
icp_access拒绝全部
http_port 80
cache_dir ufs / var / spool / squid 5000 16 256
cache_swap_low 80
cache_swap_high 95
cache_mem 150 兆字节
maximum_object_size 2048 KB
minimum_object_size 0 KB
maximum_object_size_in_memory 512 KB
memory_pools开启
memory_pools_limit 50 兆字节
请求超时 20 秒
persistent_request_timeout 10 秒
connect_timeout 20 秒
pid_filename /var/run/squid.pid
cache_mgr zbw0915@126.com
visible_hostname鱿鱼代理
cache_effective_user鱿鱼
cache_effective_group鱿鱼
dns_name服务器 218.30.19.40 218.30.19.50
architecture_stoplist cgi-bin ?
#access_log /usr/local/squid/var/logs/access.log鱿鱼
refresh_pattern ^ ftp: 1440 20% 10080
refresh_pattern ^ gopher: 1440 0% 1440
refresh_pattern -i (/cgi-bin /|\?) 0 0% 0
#refresh_pattern -i ^ http:// 240 50% 1440 忽略-重载重写-lastmod
refresh_pattern -i .htm $ 480 90% 2880 忽略-重载重写-lastmod
refresh_pattern -i .html $ 480 90% 2880 忽略-重载重写-lastmod
refresh_pattern -i .bmp $ 480 90% 2880 忽略-重载重写-lastmod
refresh_pattern -i .gif $ 480 90% 2880 忽略-重载重写-lastmod
refresh_pattern -i .jpg $ 480 90% 2880 忽略-重载重写-lastmod
refresh_pattern -i .jpeg $ 480 90% 2880 忽略-重载重写-lastmod
refresh_pattern -i .png $ 480 90% 2880 忽略-重载重写-lastmod
refresh_pattern -i .js $ 480 90% 2880 忽略-重载重写-lastmod
refresh_pattern -i .swf $ 480 90% 2880 忽略-重载重写-lastmod
refresh_pattern -i .css $ 480 50% 2880 忽略-重载重写-lastmod
refresh_pattern -i .xml $ 480 50% 2880 忽略-重载重写-lastmod
#refresh_pattern -i .yaml $ 240 50% 1440 忽略-重载重写-lastmod
refresh_pattern -i .text $ 480 90% 2880 忽略-重载重写-lastmod
refresh_pattern -i .ico $ 1440 90% 2880 忽略-重载重写-lastmod
refresh_pattern . 0 20% 4320
acl shoutcast rep_header X-HTTP09-First-Line ^ ICY。[0-9]
upgrade_http0.9拒绝高喊
acl apache rep_header服务器^ Apache
broken_vary_encoding允许apache
coredump_dir / usr / local / squid / var / cache
保存并退出!
6. 检查配置是否正确.
您可以重新启动,如果配置正确.
/usr / local / squid / sbin / squid -k解析
/usr / lcoal / squid / sbin / squid -s
ps至 | grep鱿鱼

你可以看到 ,squid代理已成功部署.
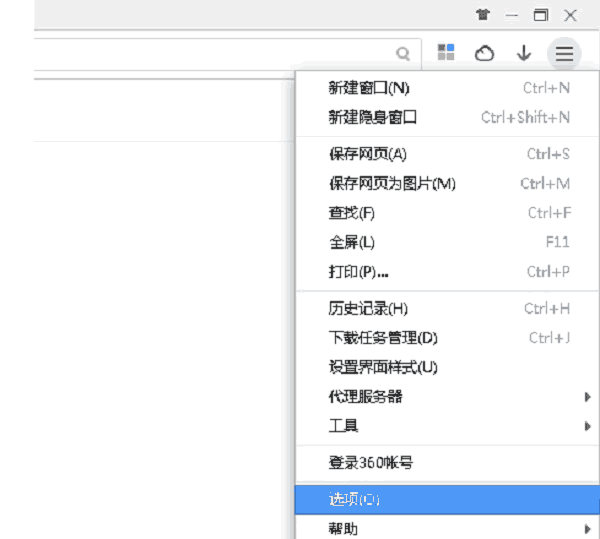
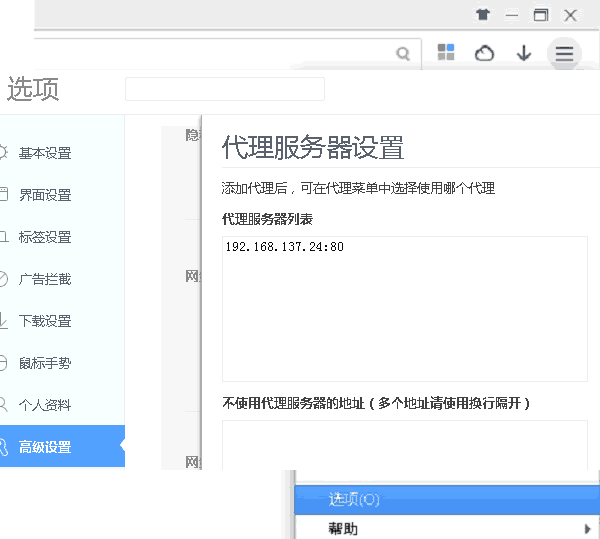
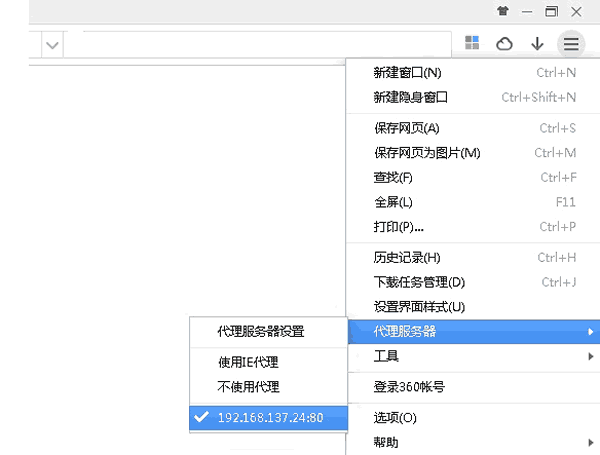
7. WIN7客户端的配置
如 360 快速浏览
8. 执行测试
访问http://www.sina.com.cn并检查页面元素加载

很明显, http://www.sina.com.cn/css/79/index2016/v0510/index.css随附
从 192.168.137.24, 鱿鱼代理服务器.
附件:
请执行以下命令, 如果您想要更方便的操作.
ln -s / usr / local / squid / sbin / squid / bin /
ln -s / usr / local / squid / sbin / squid / sbin /
ln -s / usr / local / squid / bin / squidclient / bin /
ln -s / usr / local / squid / sbin / squidclient / sbin /
一些常规命令:
鱿鱼-z 初始化
squid -k解析eheck配置是否正确
squid -k shutdown停止鱿鱼进程
鱿鱼-s启动鱿鱼
squidclient -p 3128 管理者:信息查询命中信息
squidclient -p 3128 管理者:内存检查内存信息
很好的答案,以返回此查询
扎实的论据并解释有关这一点的全部内容.