再做 Oracle 11gR2 RAC部署3
第2部分DNS正反向解析已配置好,接着我们要为oracle 集群软件,oracle数据库 创建用户,用户组,目录,环境变量,修改内核,资源限制等等。然后创建共享磁盘并格式化,使linux识别。
建用户,改口令,修改用户配置文件
为node1和node2创建grid和oracle用户环境变量 ,SID , 如下:
节点1:
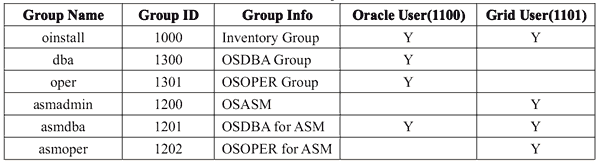
groupadd -g 1000 oinstall
groupadd -g 1200 管理员
groupadd -g 1201 阿斯姆巴
groupadd -g 1202 阿斯莫珀
useradd -u 1100 -g oinstall -G asmadmin,阿斯姆巴,asmoper -d / home / grid -s / bin / bash -c “网格基础设施所有者” 格
格 | 密码 –标准输入网格
回声 “出口TMP = / tmp” >> /主页/网格/.bash_profile
回显‘export TMPDIR = $ TMP’ >> /主页/网格/.bash_profile
回声 “导出ORACLE_SID = + ASM1” >> /主页/网格/.bash_profile
回声 “导出ORACLE_BASE = / u01 / app / grid” >> /主页/网格/.bash_profile
回声 “导出ORACLE_HOME = / u01 / app / 11.2.0 / grid” >> /主页/网格/.bash_profile
回声 “导出ORACLE_TERM = xterm” >> /主页/网格/.bash_profile
回声 “导出NLS_DATE_FORMAT =’yyyy / mm / dd hh24:我:ss'” >> /主页/网格/.bash_profile
echo‘export TNS_ADMIN = $ ORACLE_HOME / network / admin’ >> /主页/网格/.bash_profile
回声‘export PATH = / usr / sbin:$路径’ >> /主页/网格/.bash_profile
回声‘export PATH = $ ORACLE_HOME / bin:$路径’ >> /主页/网格/.bash_profile
回声‘export LD_LIBRARY_PATH = $ ORACLE_HOME / lib:/LIB:/的usr / lib’ >> /主页/网格/.bash_profile
回声‘export CLASSPATH = $ ORACLE_HOME / JRE:$ORACLE_HOME / jlib:$ORACLE_HOME / rdbms / jlib’ >> /主页/网格/.bash_profile
回声 “导出编辑器= vi” >> /主页/网格/.bash_profile
回声 “export LANG = zh_CN” >> /主页/网格/.bash_profile
回声 “导出NLS_LANG = american_america.AL32UTF8” >> /主页/网格/.bash_profile
回声 “umask 022” >> /主页/网格/.bash_profile
echo‘export PS1 =”`/ bin / hostname -s`-> “‘ >> /主页/oracle/.bash_profile
回声 “出口TMP = / tmp” >> /主页/oracle/.bash_profile
回显‘export TMPDIR = $ TMP’ >> /主页/oracle/.bash_profile
回声 “导出ORACLE_HOSTNAME = node1.localdomain” >> /主页/oracle/.bash_profile
回声 “导出ORACLE_SID = devdb1” >> /主页/oracle/.bash_profile
回声 “导出ORACLE_BASE = / u01 / app / oracle” >> /主页/oracle/.bash_profile
echo‘export ORACLE_HOME = $ ORACLE_BASE / product / 11.2.0 / db_1’ >> /主页/oracle/.bash_profile
回声 “导出ORACLE_UNQNAME = devdb” >> /主页/oracle/.bash_profile
echo‘export TNS_ADMIN = $ ORACLE_HOME / network / admin’ >> /主页/oracle/.bash_profile
回声 “导出ORACLE_TERM = xterm” >> /主页/oracle/.bash_profile
回声‘export PATH = / usr / sbin:$路径’ >> /主页/oracle/.bash_profile
回声‘export PATH = $ ORACLE_HOME / bin:$路径’ >> /主页/oracle/.bash_profile
回声‘export LD_LIBRARY_PATH = $ ORACLE_HOME / lib:/LIB:/的usr / lib’ >> /主页/oracle/.bash_profile
回声‘export CLASSPATH = $ ORACLE_HOME / JRE:$ORACLE_HOME / jlib:$ORACLE_HOME / rdbms / jlib’ >> /主页/oracle/.bash_profile
回声 “export LANG = zh_CN” >> /主页/oracle/.bash_profile
回声 “导出NLS_LANG = american_america.AL32UTF8” >> /主页/oracle/.bash_profile
回声 “导出NLS_DATE_FORMAT =’yyyy / mm / dd hh24:我:ss'” >> /主页/oracle/.bash_profile
回声 “umask 022” >> /主页/oracle/.bash_profile
节点2:
groupadd -g 1000 oinstall
groupadd -g 1200 管理员
groupadd -g 1201 阿斯姆巴
groupadd -g 1202 阿斯莫珀
useradd -u 1100 -g oinstall -G asmadmin,阿斯姆巴,asmoper -d / home / grid -s / bin / bash -c “网格基础设施所有者” 格
回声 “格” | 密码 –标准输入网格
echo‘export PS1 =”`/ bin / hostname -s`-> “‘ >> /主页/网格/.bash_profile
回声 “出口TMP = / tmp” >> /主页/网格/.bash_profile
回显‘export TMPDIR = $ TMP’ >> /主页/网格/.bash_profile
回声 “导出ORACLE_SID = + ASM2” >> /主页/网格/.bash_profile
回声 “导出ORACLE_BASE = / u01 / app / grid” >> /主页/网格/.bash_profile
回声 “导出ORACLE_HOME = / u01 / app / 11.2.0 / grid” >> /主页/网格/.bash_profile
回声 “导出ORACLE_TERM = xterm” >> /主页/网格/.bash_profile
回声 “导出NLS_DATE_FORMAT =’yyyy / mm / dd hh24:我:ss'” >> /主页/网格/.bash_profile
echo‘export TNS_ADMIN = $ ORACLE_HOME / network / admin’ >> /主页/网格/.bash_profile
回声‘export PATH = / usr / sbin:$路径’ >> /主页/网格/.bash_profile
回声‘export PATH = $ ORACLE_HOME / bin:$路径’ >> /主页/网格/.bash_profile
回声‘export LD_LIBRARY_PATH = $ ORACLE_HOME / lib:/LIB:/的usr / lib’ >> /主页/网格/.bash_profile
回声‘export CLASSPATH = $ ORACLE_HOME / JRE:$ORACLE_HOME / jlib:$ORACLE_HOME / rdbms / jlib’ >> /主页/网格/.bash_profile
回声 “导出编辑器= vi” >> /主页/网格/.bash_profile
回声 “export LANG = zh_CN” >> /主页/网格/.bash_profile
回声 “导出NLS_LANG = american_america.AL32UTF8” >> /主页/网格/.bash_profile
回声 “umask 022” >> /主页/网格/.bash_profile
groupadd -g 1300 dba
groupadd -g 1301 歌剧
useradd -u 1101 -g oinstall -G dba,歌剧,asmdba -d / home / oracle / -s / bin / bash -c “Oracle软件所有者” 甲骨文
回声 “甲骨文” | 密码 –甲骨文
echo‘export PS1 =”`/ bin / hostname -s`-> “‘ >> /主页/oracle/.bash_profile
回显‘export TMPDIR = $ TMP’ >> /主页/oracle/.bash_profile
回声 “导出ORACLE_HOSTNAME = node2.localdomain” >> /主页/oracle/.bash_profile
回声 “导出ORACLE_SID = devdb2” >> /主页/oracle/.bash_profile
回声 “导出ORACLE_BASE = / u01 / app / oracle” >> /主页/oracle/.bash_profile
echo‘export ORACLE_HOME = $ ORACLE_BASE / product / 11.2.0 / db_1’ >> /主页/oracle/.bash_profile
回声 “导出ORACLE_UNQNAME = devdb” >> /主页/oracle/.bash_profile
echo‘export TNS_ADMIN = $ ORACLE_HOME / network / admin’ >> /主页/oracle/.bash_profile
回声 “导出ORACLE_TERM = xterm” >> /主页/oracle/.bash_profile
回声‘export PATH = / usr / sbin:$路径’ >> /主页/oracle/.bash_profile
回声‘export PATH = $ ORACLE_HOME / bin:$路径’ >> /主页/oracle/.bash_profile
回声‘export LD_LIBRARY_PATH = $ ORACLE_HOME / lib:/LIB:/的usr / lib’ >> /主页/oracle/.bash_profile
回声‘export CLASSPATH = $ ORACLE_HOME / JRE:$ORACLE_HOME / jlib:$ORACLE_HOME / rdbms / jlib’ >> /主页/oracle/.bash_profile
回声 “导出NLS_LANG = american_america.AL32UTF8” >> /主页/oracle/.bash_profile
回声 “导出NLS_DATE_FORMAT =’yyyy / mm / dd hh24:我:ss'” >> /主页/oracle/.bash_profile
回声 “umask 022” >> /主页/oracle/.bash_profile
现在node1和node2的用户和用户组已创建完成.
node1和node2为grid和oracle用户创建相关路径,并赋予权限。
mkdir -p / u01 / app / grid
mkdir -p /u01/app/11.2.0/grid
mkdir -p / u01 / app / oracle
chown -R甲骨文:oinstall / u01
chown -R网格:oinstall / u01 / app / grid
chown -R网格:oinstall /u01/app/11.2.0
chmod -R 775 /u01
编辑/etc/security/limits.conf,配置oracle , grid用户的shell限制
回声 “甲骨文软件nproc 2047” >> /等/安全/limits.conf
回声 “oracle硬nproc 16384” >> /等/安全/limits.conf
回声 “甲骨文软件nofile 1024” >> /等/安全/limits.conf
回声 “甲骨文硬nofile 65536” >> /等/安全/limits.conf
回声 “网格软nproc 2047” >> /等/安全/limits.conf
回声 “网格硬nproc 16384” >> /等/安全/limits.conf
回声 “网格软nofile 1024” >> /等/安全/limits.conf
回声 “网格硬nofile 65536” >> /等/安全/limits.conf
回声 “修改/etc/security/limits.conf已成功。”
node1和node2 编辑/etc/pam.d/login
回声 “需要会话/lib/security/pam_limits.so” >> /等/ pam.d /登录
回声 “所需的会话pam_limits.so” >> /等/ pam.d /登录
node1和node2编辑/etc/profile
回声“如果 [ $USER = “甲骨文” ] || [ $USER = “格” ] ; 然后’ >> /等/配置文件
回声“如果 [ $外壳= “/bin / ksh” ] ; 然后’ >> /等/配置文件
回声‘ulimit -p 16384’ >> /等/配置文件
回声“ else’ >> /等/配置文件
回声‘ulimit -u 16384 -n 65536’ >> /等/配置文件
回声’ >> /等/配置文件
回声’ >> /等/配置文件
node1和node2修改内核参数
回声 “fs.aio-max-nr = 1048576” >> /等/ sysctl.conf
回声 “fs.file-max = 6815744” >> /等/ sysctl.conf
回声 “kernel.shmall = 2097152” >> /等/ sysctl.conf
回声 “kernel.shmmax = 1054472192” >> /等/ sysctl.conf
回声 “kernel.shmmni = 4096” >> /等/ sysctl.conf
回声 “net.ipv4.ip_local_port_range = 9000 65500” >> /等/ sysctl.conf
回声 “net.core.rmem_max = 4194304” >> /等/ sysctl.conf
回声 “net.core.wmem_default = 262144” >> /等/ sysctl.conf
回声 “net.core.wmem_max = 1048586” >> /等/ sysctl.conf
回声 “net.ipv4.tcp_wmem = 262144 262144 262144” >> /等/ sysctl.conf
回声 “net.ipv4.tcp_rmem = 4194304 4194304 4194304” >> /等/ sysctl.conf
sysctl -p
创建node1和node2的共享磁盘
共享磁盘分为OCR , 投票 , 数据 , 闪 ;其中OCR和VOTE大小均为500MB,DATA和FLASH大小均为3GB
光学字符识别: 保存node1和node2的共有配置信息, 防止“健忘”发生.
投票: 选举盘(也叫仲裁盘),防止“脑裂”发生.
数据: 放置共享数据,表空间等。
闪: 存放闪回区数据。
共享磁盘只在node1上创建即可,node2上添加现有磁盘就OK了。
node1上添加完成后, 请为OC R , 投票 , 数据 , FLAH分配总线1.0 1.1 2.Ø 2.1
node2同样为OC R , 投票 , 数据 , FLAH分配总线1.0 1.1 2.Ø 2.1 ,不能搞错.
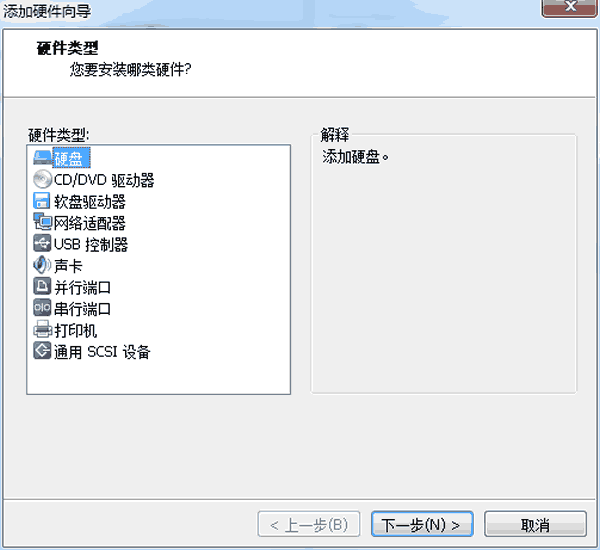
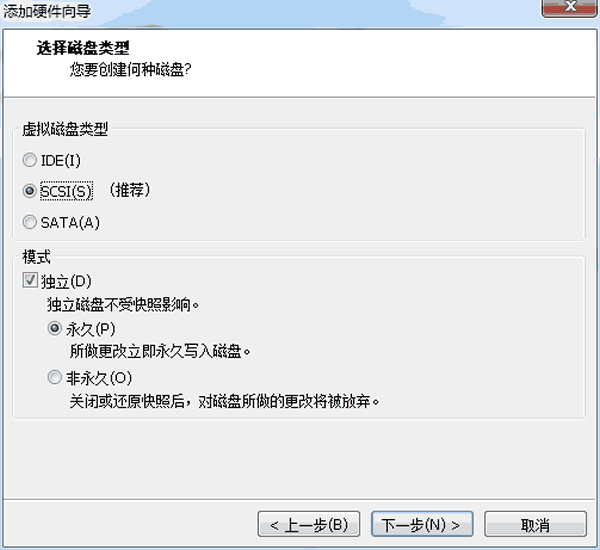
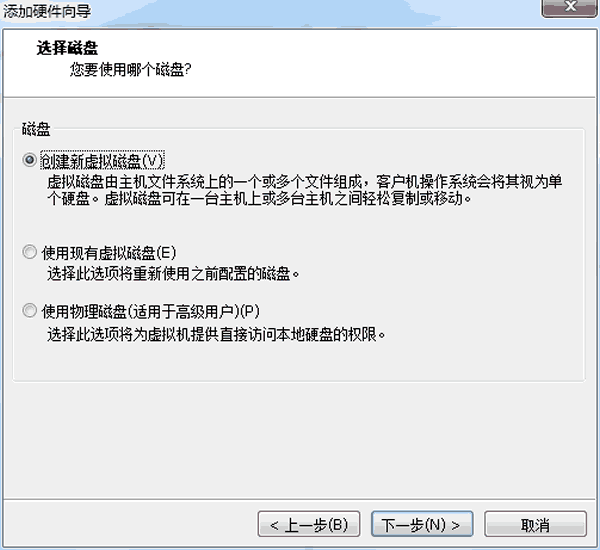
如何创建一块磁盘,以OCR为例
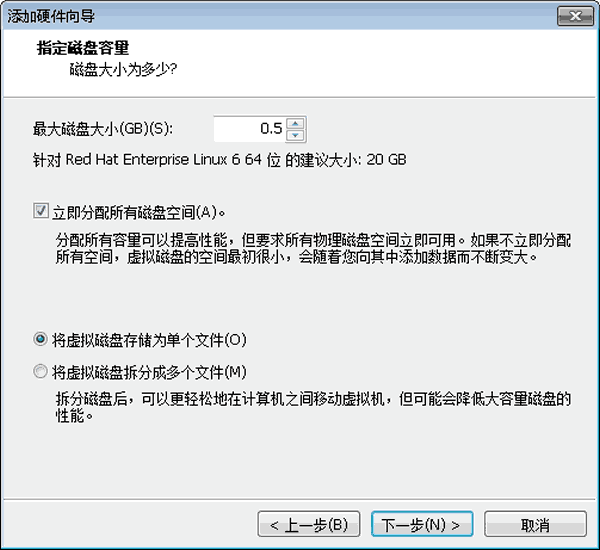
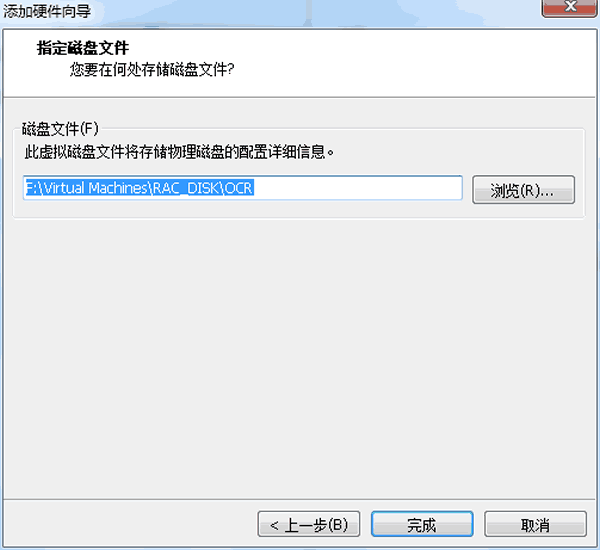
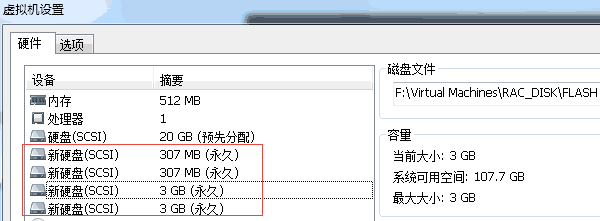
投票 , 数据 , FLASH和OCR创建方式一样,就不再演示了 ,以下是创建好的.
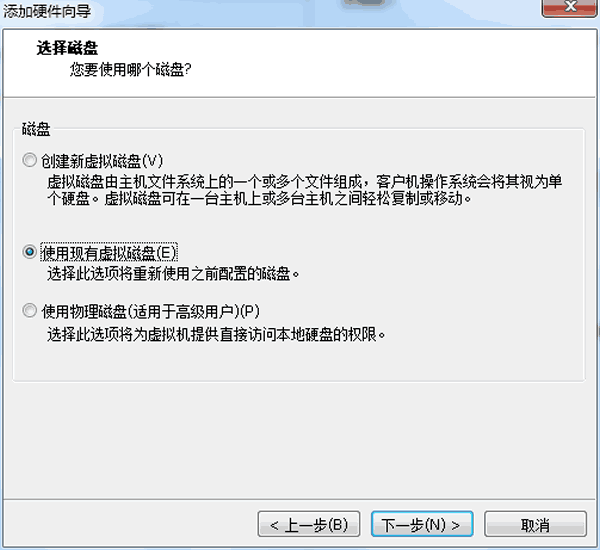
node2添加node1的磁盘,注意这里添加指的是使用现有磁盘, 否则就不是共享磁盘咯,
其他步骤基本一样.
最后,node1和node2除系统盘外,使用的都是相同磁盘.
我们还需要设置vmx文件,使node1和node2真正做到磁盘共享
打开OEL 5 64 11gnode1.vmx添加如下内容:
isk.locking = “假”
信息系统:1.0.分享= “多作家”
信息系统:2.0.分享= “多作家”
这样关闭锁定,开启多路径写入,就可以实现磁盘共享
node2的配置文件添加的内容和 node1相同.
设置完成后,开启node1和node2,然后执行fdisk -l 如下:
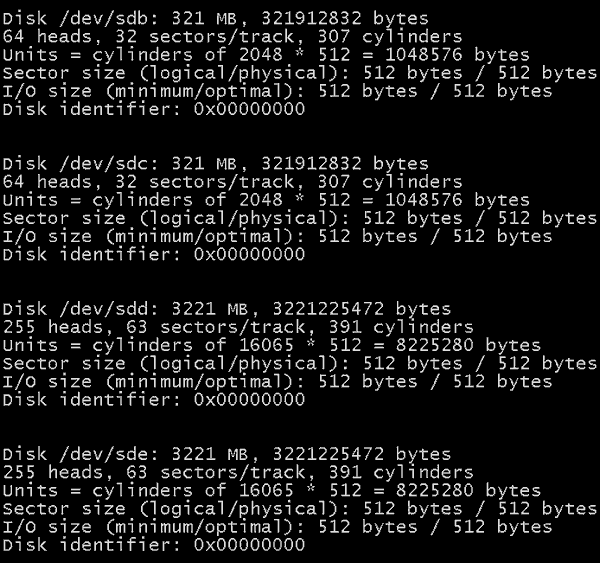
要使用这四块硬盘还必须格式化,以/dev/sdb为例
fdisk / dev / sdb
键入n ,建立新分区
键入p,建立主分区
键入1 ,从第一块开始
直接回车,使用全部磁盘
键入w,保存更改.
用同样的方法,格式话其余3个磁盘. 最终效果如下.
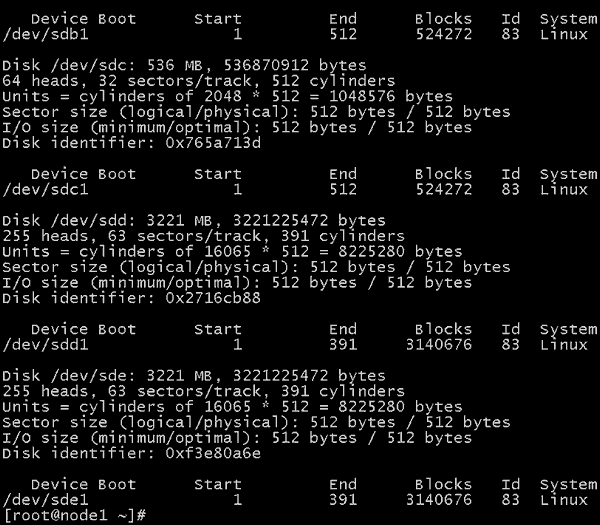
node2不用再格式化了,直接查看后 结果和node1一样.